

Learning the notes on your guitar fretboard is one of the most important things you can do to advance your guitar-playing skills. Knowing this information opens up an enormous amount of possibilities and can greatly help ease the learning curve for future guitar exercises.
From scales to soloing and chord positions/progressions, knowing where each guitar note is without having to think about it will put you well ahead of other guitarists. This guide will give you some background information regarding how the notes on your guitar fretboard are laid out and of course provide you with some helpful tips, tools, and exercises to assist you in learning the notes on your guitar fretboard as quickly as possible.
Chromatic Scale
The chromatic scale represents all 12 notes that exist in Western music. Knowing these notes should be the starting point for anyone beginning to learn guitar theory as it is constantly in use. These notes ascend and descend in half-step increments.
- A half step corresponds to moving up or down 1 guitar fret.
- A whole step corresponds to moving up or down 2 guitar frets.
The chromatic scale can start at any root note. For this example, we’ll use C as our starting point. Therefore, the natural notes that exist within the chromatic scale starting with C are as follows:
C – D – E – F – G – A – B
However, this corresponds to only 7 notes and we mentioned that there were 12 notes in the chromatic scale. The additional notes are made up of what is called sharps (denoted by “#”) or flats (denoted by ♭). Read this article to learn more about the difference between sharp and flat notes.
Sharps (or flats) exist for the following notes:
C# – D# – F# – G# – A#
This can also be represented as:
D♭ – E♭ – G♭ – A♭ – B♭
As we can see, these 5 additional notes plus the 7 natural notes previously mentioned make up our 12 notes which correspond to the chromatic scale. Therefore, the result is:
C – C# – D – D# – E – F – F# – G – G# – A – A# – B
You may have noticed that there are no sharp notes for E and B – remember this as you practice learning the chromatic scale.
For visual learners, we can also represent this scale in the chromatic circle as follows:
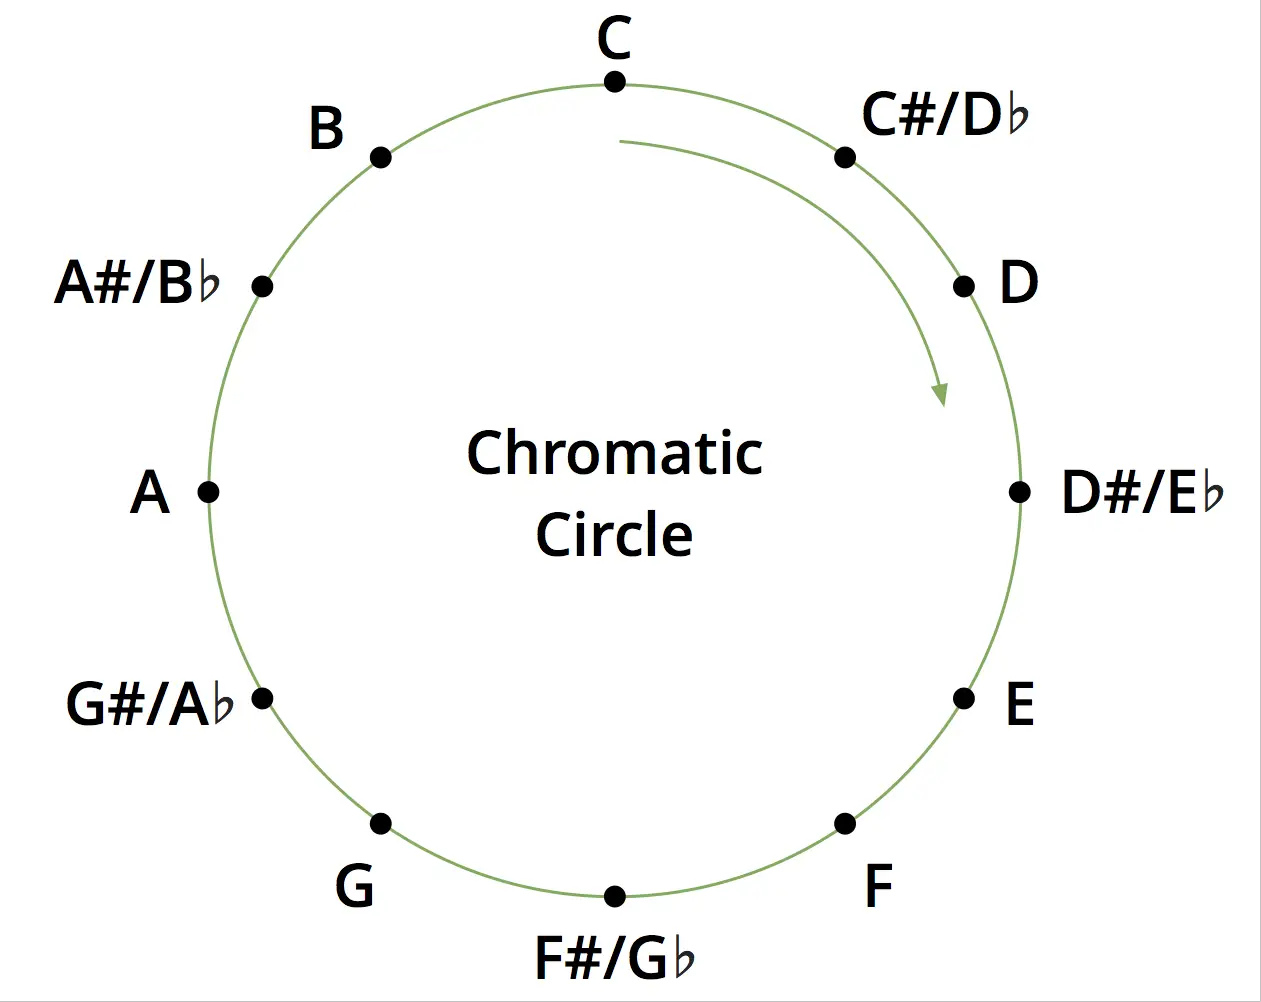
Starting from the C note, you would move clockwise around the circle, ascending up the chromatic scale and reaching a higher tone with every half step.
Once you reach the 12th note of the chromatic circle, the whole process starts over again, this is what’s known as an octave – explained below. Now that you have a better understanding of what the chromatic scale is, let’s take a look at how this applies to the notes on a guitar fretboard.
Notes on a Guitar Fretboard
Like the chromatic scale, there are really only 12 notes on a guitar’s fretboard. The same 12 notes can be found on every string of a guitar, only they are in different positions. The most important notes to learn when first starting out are the natural notes (i.e. notes that are not # or ♭).
This is useful as once the natural notes are memorized, it is much easier to incorporate the sharps or flats as they will be directly in front or behind the natural note.
So, as the image below shows, we have taken the natural notes of the chromatic scale (which are: C – D – E – F – G – A – B) and identified where each note is on the guitar fretboard.

Now that we know where all of the natural notes are located on the fretboard, we can easily add the sharps or flats. For the sake of simplicity, we are going to stick to using sharps instead of flats.
Note: If you know where the natural notes are on the fretboard, you can easily fill in the blanks by adding a sharp note next to every natural note, except for E and B (as they do not have sharps).
Once the fretboard is populated with all of the sharp notes, it would look like this:

With all of the notes populated, we can see the placement of all sharp notes (in black) and all natural notes (colored).
If you haven’t already noticed, at the 12th fret the notes begin to repeat. Every open string note (i.e. EADGBE) repeats at fret 12. This goes on for all subsequent frets as well.
Notes at fret 13 are the same as fret 1, notes at fret 14 are the same as fret 2, and so on. This is what’s called an octave.
What are Octaves?
To say that you want to hear a note an octave higher means that you would play the exact same note but at double the frequency of the current note. Octaves can go either up or down in frequency, thus, you can half the frequency or you can double it. Either way, it will all end up being the same note.
There are multiple octaves for each note on a guitar’s fretboard. For example, let’s say we take the A note on the low E string. This note is located at fret position 5. However, if we move up 12 frets (aka semitones) on the same string, we will end up at fret position 17 which is also an A note, just an octave higher.
This can sometimes confuse beginner guitarists as they hear a higher frequency note and automatically think that it is a different note. Just remember, everything repeats itself after the 12th fret.
However, octaves aren’t only found by moving up 12 frets on a particular string. You can also find different octaves for the same note on different strings. Let me explain this with the C major scale.

As we can see, the starting position of the C major scale is at note C on the 5th string and 3rd fret. When we play the sequence of the scale and reach the end, we reach the C note again.
However, do you notice a difference in frequency between both C notes?
This is because the first C note is an octave higher than the second C note. As mentioned, there are multiple octaves for the same notes on a guitar fretboard and these really come in handy when you want to do more advanced stuff such as soloing.
Read Next: Check out this list of 10 hardest guitar solos you can learn to impress your friends.
This Wikipedia octave article is great if you want to learn more about octaves from a theoretical standpoint.
Learning the Notes on a Guitar Fretboard
Now that we’ve covered a bit of background information about the guitar fretboard, it’s time to dive into learning the notes. This can be a challenging task and requires practice and dedication. However, if you practice learning the notes on the guitar fretboard it will pay off immensely in terms of how easy it will be to learn new techniques/skills on the guitar.
There are many different tactics to go about learning the notes on the guitar fretboard however, I’m going to provide you with a few exercises to get you learning as quickly as possible.
Exercise Set A
Learning all the notes on the fretboard and being comfortable in knowing where each note is takes time and practice. That’s why I’ve split up the exercises into two sets.
Once you have completed the exercises in set A, you can move on to set B. However, you should continue practicing both sets even once you are done until you are completely comfortable with knowing all the notes on the guitar fretboard.
Let’s dive into it.
In this set of exercises, you’re going to want to practice learning the notes on one string every day. Try to practice this for at least 10-20 minutes every day.
Day 1
The first day’s exercise involves learning the notes on the low E string (the thickest one), the natural notes are as follows:

Start by moving up and down the fretboard to the positions shown above and play each natural note. As you play the note, try calling out the note as well.
So, you would start off by playing the open E string and say “E”. Then you would play the first fret of the E string and say “F”. Next would be the third fret, say “G”, and so on until you hit the 12th fret. Once you reach the 12th fret, start going the opposite way and do the same thing over again in a descending fashion.
You can use the legend shown above when you’re just starting out, however, when you become a bit more comfortable, try moving up and down the fretboard doing the same thing but without looking at the legend.
Once you are comfortable with ascending and descending the fretboard, try randomly moving to a particular natural note on the E string and calling out that note. Here are a few randomized example positions you can try:
- 3- 7 – 1 – 12 – 10 – 3 – 8 – 5 – 0 – 7 – 5
- 10 – 5 – 0 – 12 – 1 – 7 – 10 – 3 – 5 – 8
- 7 – 8 – 12 – 3 – 10 – 0 – 1 – 7 – 5 – 12
- 12 – 8 – 3 – 0 – 10 – 7 – 1 – 5 – 12 – 1
If you are curious to see if you called out the above-randomized patterns correctly, try recording yourself calling out each note and then later review the recording with the legend handy to see how you did. In this article, I mention the best DAWs for beginners which are all great for this exercise.
Day 2
The next 5 days will be very similar to day 1. The only difference is that you will be learning a new string each day. Remember, for every day that passes, try to practice the previous day’s randomized patterns.
So for day 2, start off your day by practicing calling out the notes of the randomized patterns of day 1 for at least 5-10 minutes before you start the following exercise.
Day 2 will be about learning the natural notes on the A string, which are as follows:

Similar to day one, move up and down in an ascending and descending fashion from position 0 – 12 and call out each note individually as you play it. Once you are comfortable with that try playing the following randomized patterns and calling out the note at the same time:
- 5 – 2 – 10 – 0 – 8 – 3 – 7 – 12 – 2 – 5
- 8 – 12 – 2 – 0 – 3 – 10 – 5 – 12 – 7 – 2
- 0 – 12 – 5 – 8 – 2 – 10 – 7 – 2 – 0 – 5
- 2 – 7 – 10 – 2 – 5 – 0 – 3 – 12 – 8 – 0
Day 3
As the days go on, it will take a little more time since you should still be practicing the previous day’s exercises. I’ll reiterate this again, it is very important to practice the previous day’s exercises.
This helps refresh your memory and ensure that you remember what you learned the day before. Start day 3 off with 5-10 minutes of practicing day 1 exercises and 5-10 minutes of practicing day 2. Then you can start learning the notes on the D string as follow:

Again, here are some examples of randomized patterns you can use for practicing the notes of the D string:
- 9 – 3 – 0 – 5 – 12 – 7 – 2 – 10 – 0 – 5
- 2 – 10 – 12 – 5 – 3 – 9 – 0 – 7 – 10 – 12
- 7 – 9 – 2 – 5 – 3 – 12 – 10 – 0 – 2 – 5
- 12 – 5 – 2 – 10 – 9 – 0 – 7 – 3 – 5 – 9
Day 4
On day 4 you’ll start the day practicing each of the 3 previous day’s exercises for 5-10 minutes each. Once this is complete, you can move on to learning the notes on the G string as follows.

Randomized patterns you can use for practicing the notes on the G string:
- 4 – 9 – 0 – 2 – 5 – 12 – 7 – 2 – 10 – 4
- 9 – 10 – 2 – 5 – 4 – 12 – 7 – 0 – 12 – 2
- 12 – 0 – 2 – 10 – 4 – 9 – 5 – 7 – 2 – 12
- 7 – 4 – 10 – 5 – 0 – 2 – 9 – 12 – 7 – 9
Day 5
On day 5 you’ll start the day practicing each of the 4 previous day’s exercises for 5-10 minutes each. Once this is complete you can move on to learning the notes on the B string as follows.

Randomized patterns you can use for practicing the notes on the B string:
- 1 – 8 – 3 – 12 – 10 – 0 – 5 – 1 – 6 – 3
- 10 – 0 – 1 – 8 – 5 – 12 – 6 – 3 – 8 – 12
- 0 – 12 – 1 – 10 – 3 – 8 – 5 – 6 – 12 – 0
- 3 – 10 – 0 – 1 – 6 – 5 – 3 – 12 – 8 – 1
Day 6
This day is a bit easier since there is nothing new to learn. We’ve reached the high E string which contains the exact same notes as the low E string that you learned on day one.
On day 6 remember to practice the previous 5 day’s exercises for 5-10 minutes each and finish off with doing a bit of extra practice with the high E string, for consistency purposes.

You can use the same randomized patterns as day 1 for your practice with the high E string:
- 3- 7 – 1 – 12 – 10 – 3 – 8 – 5 – 0 – 7 – 5
- 10 – 5 – 0 – 12 – 1 – 7 – 10 – 3 – 5 – 8
- 7 – 8 – 12 – 3 – 10 – 0 – 1 – 7 – 5 – 12
- 12 – 8 – 3 – 0 – 10 – 7 – 1 – 5 – 12 – 1
Those are your first 6 days of guitar fretboard note-learning exercises! Once you’ve reached day 6 you have 2 options.
- If you’re not comfortable yet with taking on a different set of exercises, no worries. Simply restart from day one and follow the exact same process.
- Move on to exercise set B which revolves around octaves and identifying where a single note is on each string.
Exercise Set B
Exercise Set B is the second set of exercises that you’ll go through in order to help further master the guitar fretboard. This set of exercises revolves around octaves and will help you better visualize where each individual note is on each string specifically.
For this set of exercises, practice each day by playing the notes from top (low E string) to bottom (high E string) and back up. Examples are provided below.
Day 7 – A Notes
Day 7 will focus specifically on the A note and where it exists in the first 12 frets of the guitar. Start this exercise at the Low E string and call out the note along with the fret number. Do this for each A note that you play.
For example, the first A note is located on the 5th fret, so you would say A 5. The next A note is located on an open string so you would say A open, then A 12, A 7, A 2, A 10, and A 5. Once you’ve reached the bottom, start working your way back up from the A 5 position on the high E string.

Do this over and over again for between 5-10 minutes. This will help ensure you memorize when each octave of each note is. Soon enough it will become second nature.
Day 8 – B Notes
Similar to exercise Set A, start each day off by practicing what you learned the day(s) before. So, on day 8 practice the exercise from day 7 for between 5-10 minutes. Then move on to do the same exercise routine for the B notes on the fretboard.
Starting from the top and working your way down, you would call out each note as follows: B 7, B 2, B 9, B 4, B open, B 12, B 7. Like day 7, work your way from top to bottom and from bottom to top calling out the note and fret position as you go.

Day 9 – C Notes
On day 9 you will practice the exercises from both day 7 and day 8 for 5-10 minutes each. Once complete, move on to the C notes exercise. Again, starting from the top and working your way down, you would call out each note as follows: C 8, C 3, C 10, C 5, C 1, C 8. Work your way from top to bottom and from bottom to top calling out the note and fret position as you go.

Day 10 – D Notes
On day 10, practice the exercises from day 7, 8, and 9 for 5-10 minutes each and then move on to the D notes as follows: D 10, D 5, D open, D 12, D 7, D 3, D 10. Work your way from top to bottom and from bottom to top calling out the note and fret position as you go.

Day 11 – E Notes
On day 11, practice the exercises from day 7, 8, 9, and 10 for 5-10 minutes each and then move on to the E notes as follows: E open, E 12, E 7, E 2, E 9, E 5, E open, E 12. Work your way from top to bottom and from bottom to top calling out the note and fret position as you go.

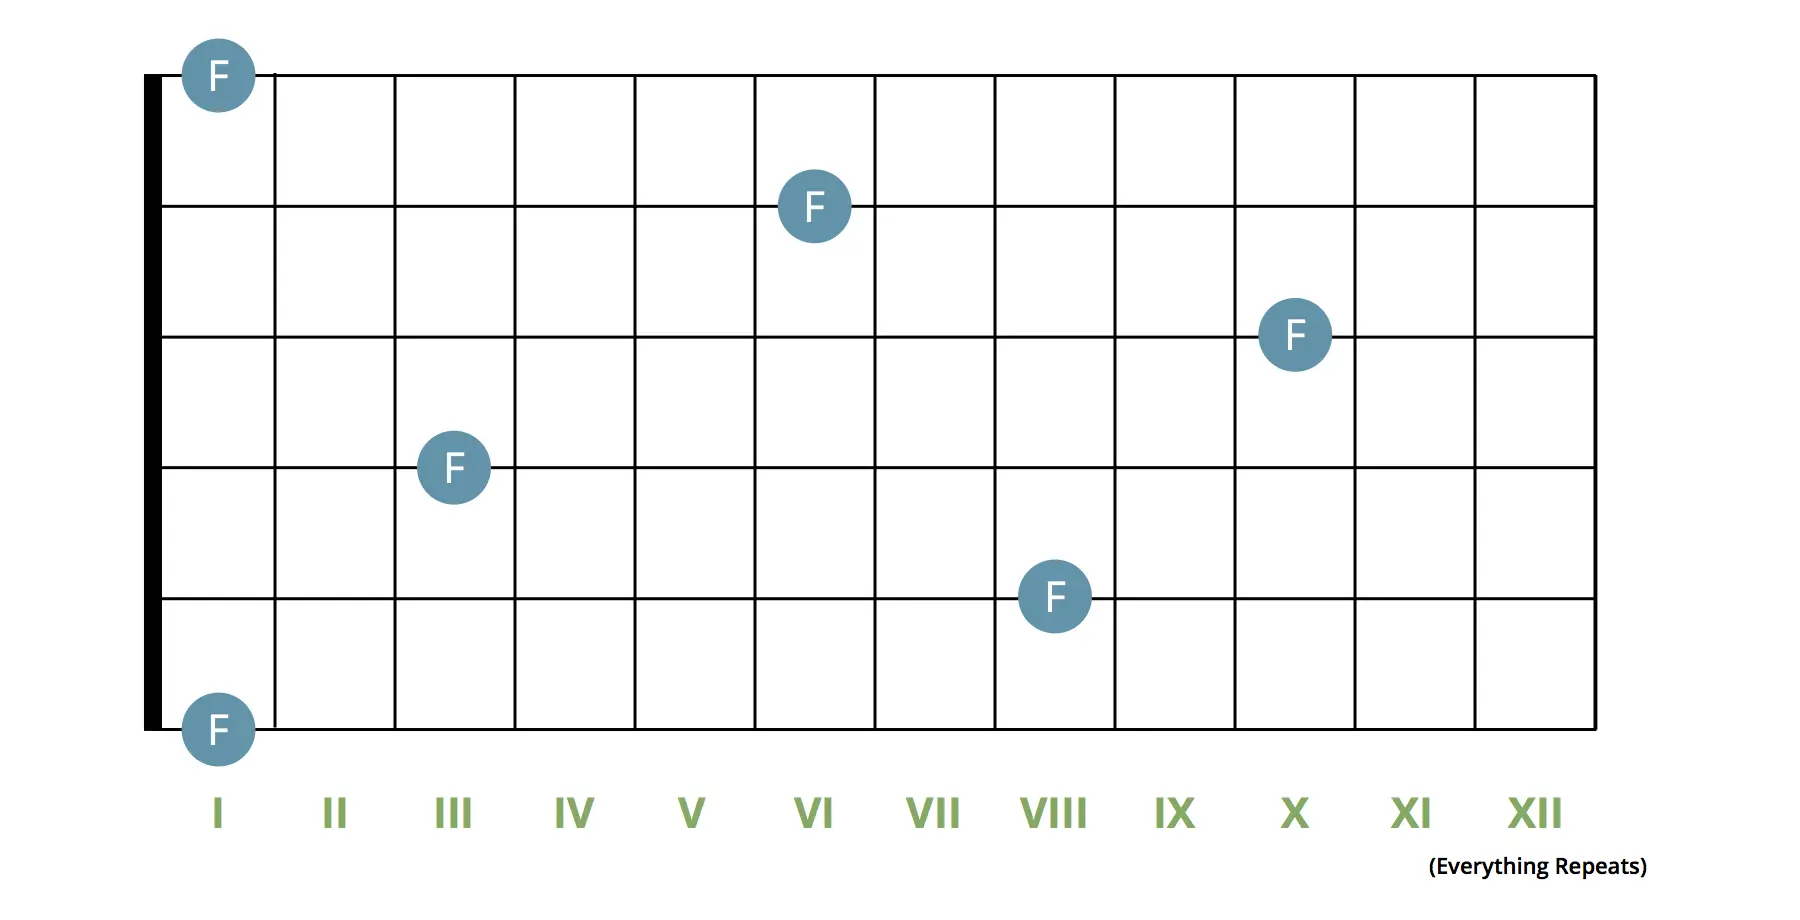
Day 12 – F Notes
On day 12, practice the exercises from day 7, 8, 9, 10, and 11 for 5-10 minutes each and then move on to the F notes as follows: F 1, F 8, F 3, F 10, F 6, F 1.
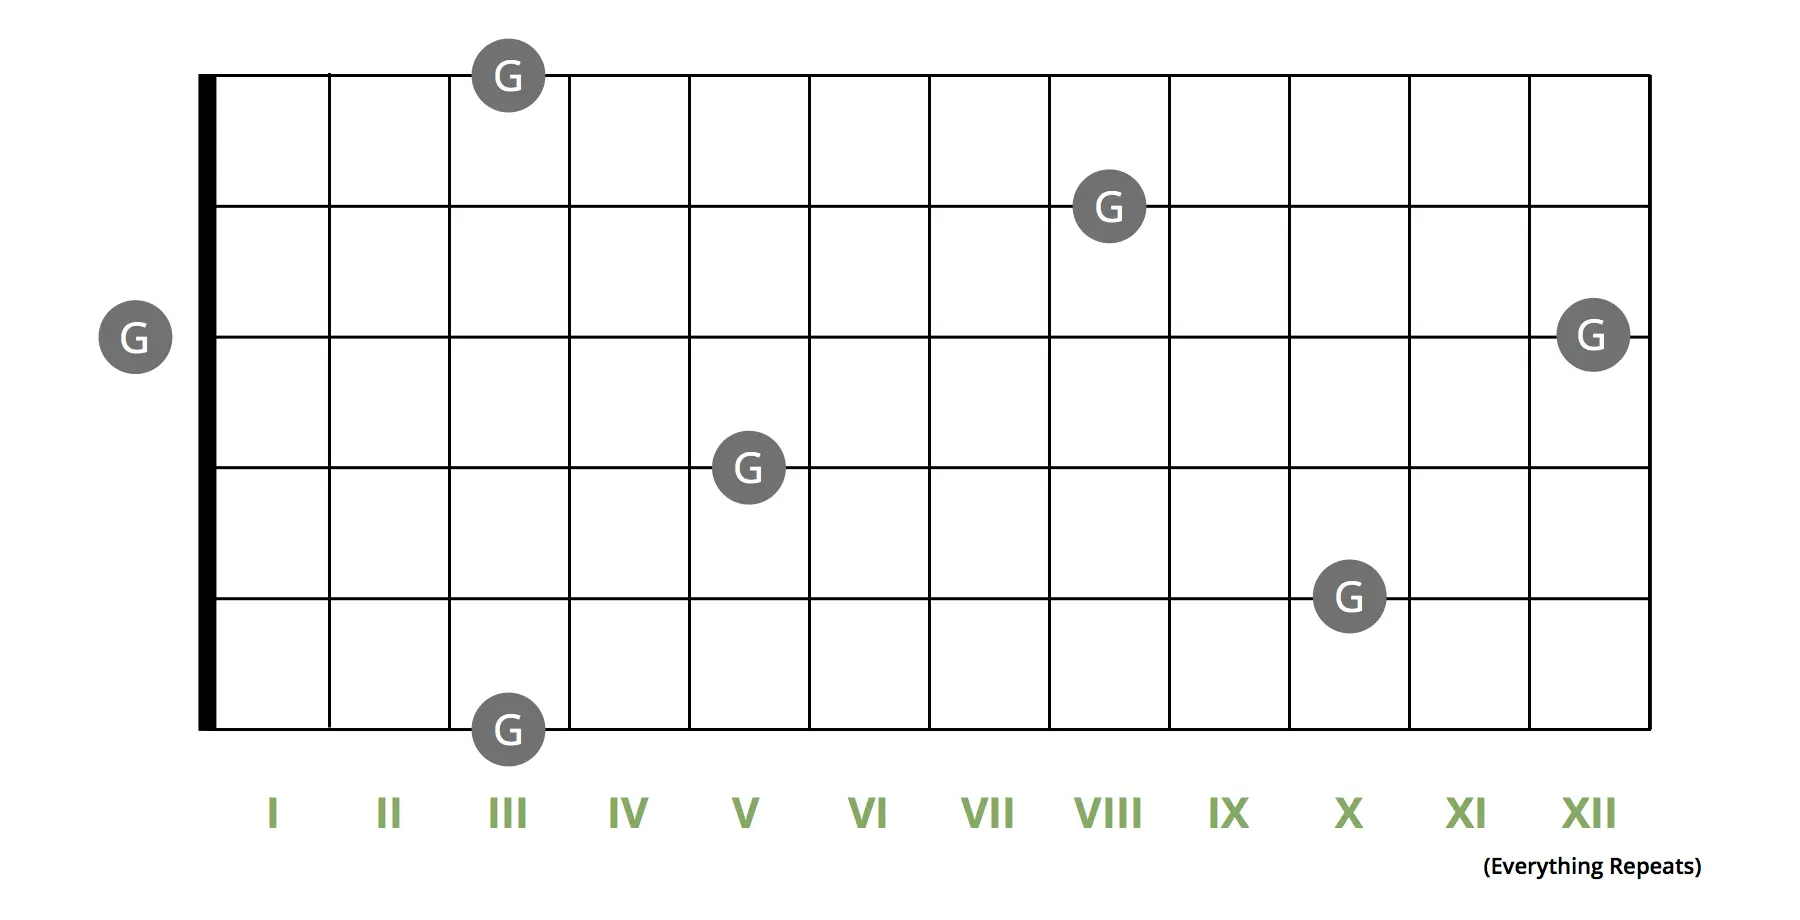
Day 13 – G Notes
Finally, on day 13, practice the exercises from day 7, 8, 9, 10, 11, 12 for 5-10 minutes each and then move on to the G notes as follows: G 3, G 10, G 5, G open, G 12, G 8, G 3. Again, work your way from top to bottom and from bottom to top calling out the note and fret position as you go.
Congratulations! You’ve completed 13 days of learning the guitar fretboard training. You should now feel much more comfortable with the notes on the guitar fretboard. However, if you don’t quite feel as though you’re as comfortable as you think you should be, simply go through each exercise again from the beginning.
To be truly comfortable with the guitar fretboard and knowing where each note is without having to think about it will take time. Using the above exercises is a fantastic starting point for those just starting to learn the notes on the guitar fretboard, however, it requires continuous practice.
Whenever you’re playing a song or a solo think about where your root notes are and the playing possibilities that are available throughout the fretboard.
Additionally, if ever you’re working on a song in a particular key and need a quick legend that tells you where each natural note is located, use the above images as a reference. As you go on, you’ll need the legends less and less and you’ll be able to accurately find and visualize each note on your own.
Additional Tips on Learning the Notes on the Guitar Fretboard
There are various methods to learning the notes on the guitar fretboard, however, I believe using the above exercises will allow you to learn them the quickest. There are also a few additional tips and tricks I wanted to mention regarding learning the notes on the guitar fretboard.
- Remember that all notes on the 5th and 10th fret are natural notes (i.e. no sharps or flats). Make special note of this to help give you your bearings as you ascend and descend the fretboard.
- Practice the above exercises with an online metronome. Start out slow (60 bpm) and gradually increase the speed as you feel more comfortable.
- Really try to listen to the notes as you play them to help your brain associate that fret position with the particular sound it produces.
- Use the dotting system on your guitar to help you more easily move up and down a certain amount of frets. Most guitars have dots at frets: 3, 5, 7, 9, 12, 15, 17, etc.
Benefits of Mastering the Fretboard
If you’re still fairly new to the guitar, you may be asking yourself “what are the benefits of mastering the fretboard”. This is a great question. Being comfortable with where the notes are on the fretboard will come in handy for a few reasons:
- Chords – Chords are moveable and can be played in many different variations across the fretboard. This is commonly referred to as the CAGED system. Knowing where each note is on the guitar fretboard will allow you to easily move to your desired root note and play the chord. This is especially useful for barre chords and power chords. To learn more about guitar chords, read our Most Popular Beginner Guitar Chords article.
- Scales – Similar to guitar chords, scales are also moveable up and down the guitar fretboard. Knowing where the root note of the guitar scale you want to play is will allow you to easily practice that scale or use it for guitar soloing or riff creation purposes.
- Guitar Soloing – This goes hand in hand with scales. If someone is playing a song in the Key of C, knowing where the C notes are on the guitar fretboard will allow you to easily solo over that song. Combining this knowledge with knowing a few scale patterns will boost your guitar soloing skills incredibly. Check out the list of our list of best guitar solos to get started.
Fretboard Memorization Tools
The following section is a list of awesome fretboard memorization tools. Use these tools if you don’t have a guitar around or just want to further practice memorizing the fretboard notes.
I would also recommend challenging yourself before and after the completion of the 13 days of exercises above to see how much faster you are at identifying notes.
- Fretboard Cyber Trainer – This is a great tool for checking your fretboard note knowledge. It acts more or less as a game as it gives you a certain amount of time to identify the fretboard notes and based on how many you got right in that amount of time it provides you with a score. This is a great tool for keeping track of your progress based on your score. You also have a few other options including the ability to section off a certain portion of the fretboard as well practice through specific note types (e.g. natural notes only, open strings, etc).

- Fretboard Note Identification – This tool is somewhat similar to the fretboard cyber trainer above. With this tool, you also have the ability to section off only certain frets of the fretboard, start a challenge mode, switch to a left-handed fretboard, etc.

- Fretboard Note Decal – This product is a little different from the previous two tools mentioned. This fretboard note decal is a collection of little stickers that you would place at every note along the fretboard of your guitar. This can be helpful for those who aren’t yet familiar with the guitar’s fretboard but still want an easy way to visualize the notes.

Final Thoughts
That’s it! Now you should have all the tools and exercises necessary to learn the notes on the guitar fretboard in no time.
Learning the guitar’s fretboard notes is no easy task. It takes time and dedication. But trust me, once you learn it, you’ll unlock a whole world of potential and so many aspects of music and theory will begin to make a lot more sense.


0 Comments