

Learning guitar chords is often one of the first things beginner guitarists do. You only need to know a few popular chords in order to be able to play a huge number of songs. This beginner’s guide on guitar chords (which includes a guitar chords chart) will provide you with the necessary chords everyone should know as both a beginner and intermediate player.
Before jumping into learning the chords provided in the guitar chords chart below, I wanted to first explain what a guitar chord actually is.
What Is a Guitar Chord?
As Wikipedia defines it, “a guitar chord is a set of notes played on a guitar”. Although a very basic definition, it is technically correct.
To explain it a little further, a guitar chord is made up of 3 or more notes sounded together. The C chord for example is made up of notes C, E, and G. The C note corresponds to the placement of your third finger in the image below, the E note corresponds to the second finger, and the G note corresponds to the open note of the third string from the bottom.

You may be asking yourself, but why is it called the C chord? What rule specifies that this chord should be called C? This is due to the fact that the lowest note in the chord is a C note and is located where your third finger should be in the chord diagram above.
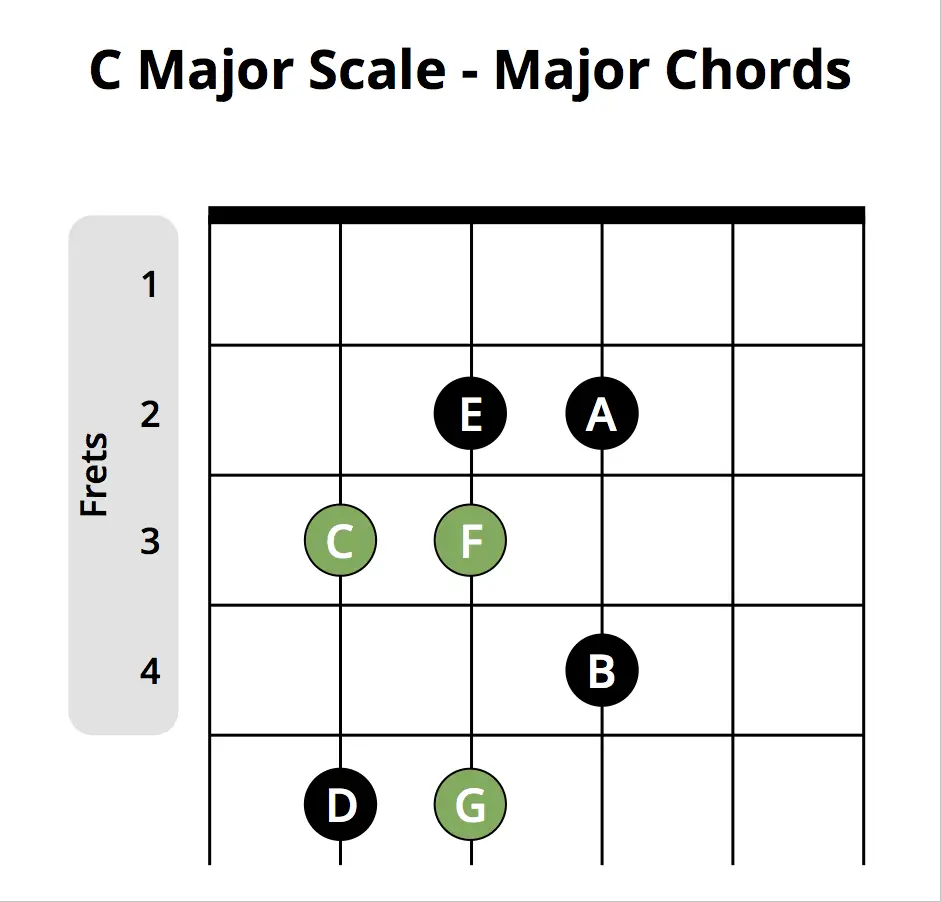
To dig a little deeper into guitar chords, I’ll illustrate how a basic major guitar chord is made. Taking the C major chord again as an example, let’s take a look at the C major scale (Do re mi… sound familiar?).

Starting from the C note on the third fret, the scale goes: C – D – E – F – G – A – B – C. Now, chords such as C major are made by taking the first scale note (aka the root), skipping the next, taking the next, skipping the next, and taking the next.
Therefore, within the C major scale, the C chord takes the notes which are underlined: C – D – E – F – G – A – B – C. You can use this “use one, skip one” formula beginning at any note within the scale to form chords. For instance, if you start at the D note within the C major scale you will get: C – D – E – F – G – A – B – C which is a D minor.

Taking every second note in a scale until you have 3 notes is the method used for creating many popular chords. Now that you have a better understanding of how basic chords are made, let’s take a look at another type of guitar chord, the barre chord.
Playing Barre Chords
Barre chords are another very useful type of chord due to their versatility. Although a little harder to play than the traditional guitar chords for beginners, they certainly come in handy for making new sounds and playing more advanced songs.
The name “barre chord” stems from the fact that these chords usually use the index finger to press down on all six strings (this is called a full barre). If the index finger is only used to press down on 2-5 strings at once, this is called a half barre.
When first starting out with barre chords you’ll likely notice that they’re quite strenuous on your fingers. This is natural and will take time for your fingers to get stronger and used to pressing down all strings with one finger.
Note: To exercise your index finger in order to play barre chords easier, start off at the fifth fret by pressing down the top two strings (only with your index finger). Strum those two strings and make sure the sound is clear. Once you’ve achieved that, move on to three strings at once, then four, and so on until you can press down all six strings using only your index finger. During this process, be sure you are able to clearly sound out all of the strings you are pressing down before pressing down on any additional strings.
Let’s take a look at an example barre chord. This diagram below is an A major in barre chord form.
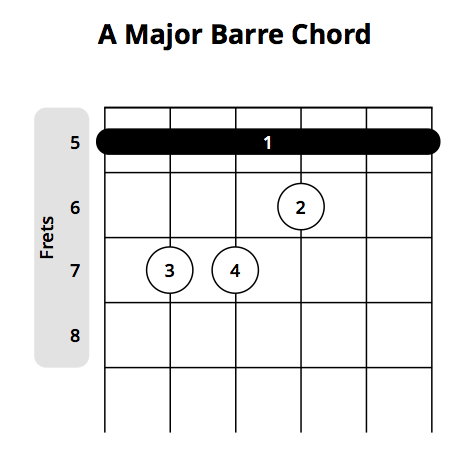
With this example, you’ll want to use your index finger to press down on all the strings on the fifth fret and then create the E Major shape with fingers 2, 3, and 4. Remember, when first starting out with these types of chords, you’ll want to focus on strengthening your fingers.
Use the exercise I mentioned above to help increase finger strength. Additionally, you can also use a finger exercising tool to help strengthen your fingers whenever you have some downtime and don’t have your guitar around.
Practicing playing guitar chords and using a finger exercising tool will help speed up the finger-strengthening process and allow you to start playing barre chords much faster.
If you want to learn more about barre chords, I would recommend looking into the CAGED system as well as checking out the barre chords guide over at Guitar Noise.
Guitar Chords Chart
So now that we’ve gone through a bit of an introduction to guitar chords and where they come from, let’s jump into our guitar chord chart. Although there are a ton of guitar chords out there, I wanted to specifically highlight common guitar chords for beginners / intermediate player chords that you can practice.
You’ll also likely come across these chords when learning new songs so if ever you need to double-check how a certain chord should be played, be sure to keep this guitar chord chart handy.
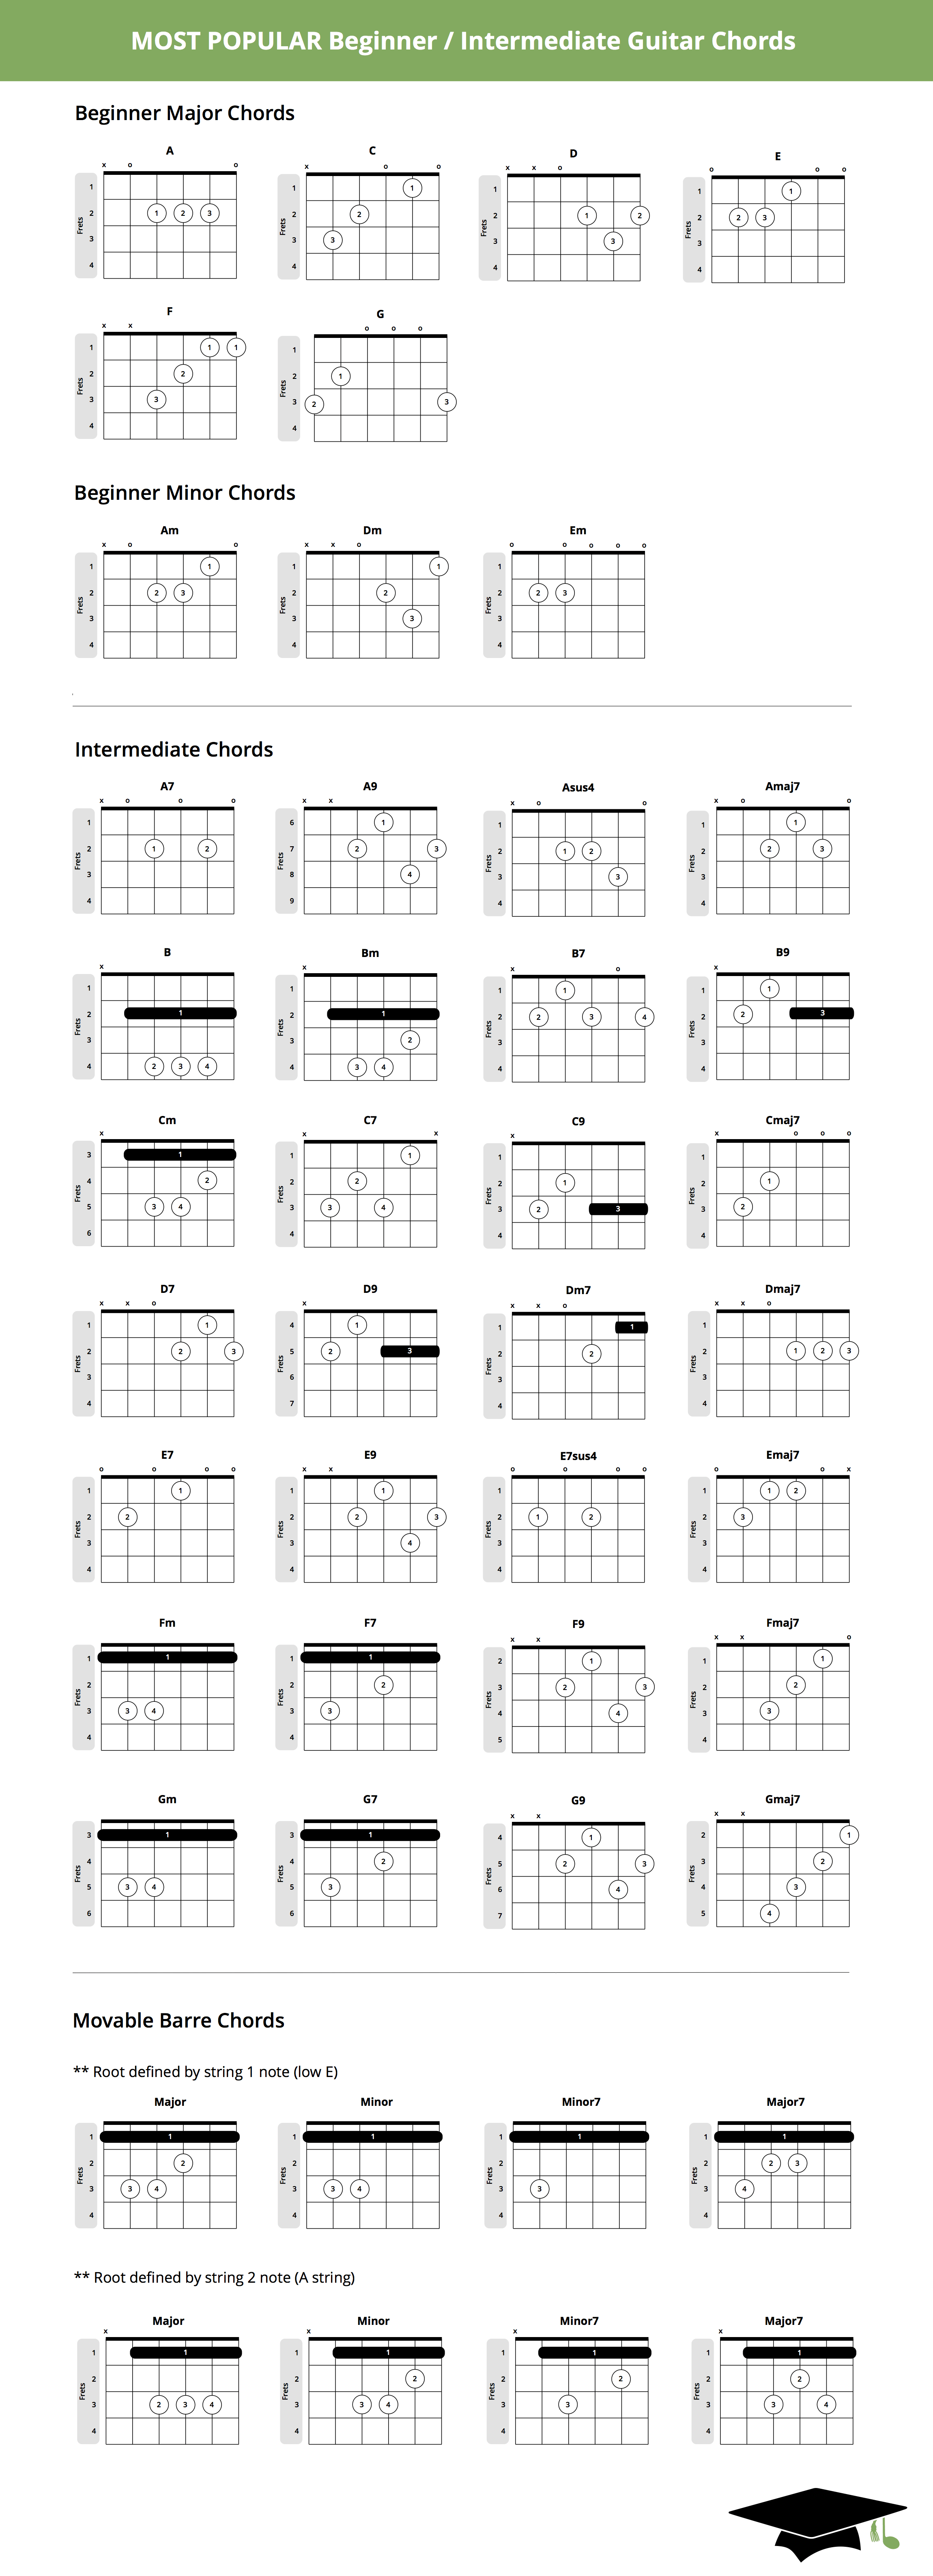
The following guitar chords chart is broken into two sections, beginner guitar chords, and intermediate guitar chords.
The last section of this guitar chords chart “Moveable Barre Chords” is a bit special as you can use these positions to play a variety of different chords. It all depends on which root note you choose. The root note of the first row of moveable barre chords is defined by the low E string.
For example, if you were to take the first example (Major) and use those finger positions starting from the 5th fret, you would get an A major. This is because the 5th fret of the low E string is an A note, and therefore the root note of this chord.
The diagram below is an outline of all the notes of the fretboard for each string within the first 12 frets of a guitar. Keep this handy as this comes in very useful when you’re still learning what each note is. Once you have this down, it will open up a whole range of possibilities for scales, arpeggios, etc.
For the purposes of this article, however, focus on the notes of string 1 (low E) and string 2 (A). These will help you determine the root for playing chords using the moveable barre chords method above.

To help explain the image above a little further, the notes in green on the far left are the open string notes. Each column corresponds to a fret on the guitar and each note is different all the way up until the 12th fret where everything begins to repeat again.
Note: The notes on the 12th fret are the same as the open string notes, only they are 1 octave higher.
This means that after the 12th fret, the notes repeat themselves, only they are all an octave higher. For example, the notes on fret 1 are the same as fret 13, the notes on fret 2 are the same as fret 14, and so on…
What Is a Chord Progression?
A guitar chord progression is a series of chords played one after another to create a harmonic movement. There is nearly an infinite amount of chord progression combinations you can use to evoke a variety of musical emotions (e.g. sad, happy, suspenseful, etc.).
A good chord progression is made with a combination of chords that provide both stability and tension throughout the progression. For example, most music tends to follow this pattern:
- Start off with a chord of stability
- Depart from stability
- Create tension
- Return to stability
As far as knowing which chords you can safely use in a basic chord progression, this can be largely based on the major scale. For example, taking the C Major scale we outlined at the beginning of this article, we can use it to demonstrate how a chord progression can be formulated.
There are 7 notes in the major scale. In the case of C Major, these notes are:
- C
- D
- E
- F
- G
- A
- B
The harmonization of any major scale results in 3 major triads (or notes that can be stacked in thirds). The 3 major triads for any major scale are at positions 1, 4, and 5. Therefore in the case of the C major scale, this would correspond to notes C, F, and G.
There are also exists 3 minor chords which correspond to positions 2, 3, and 6, and notes Dm, Em, and Am, in the case of this example.
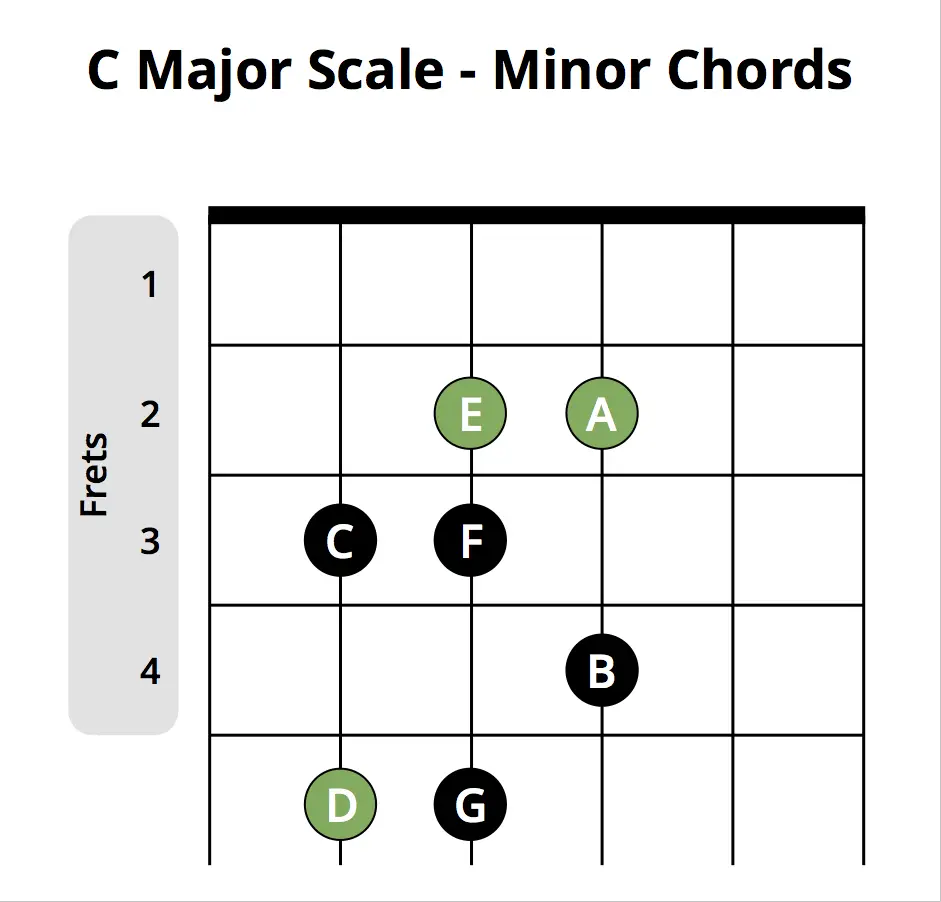
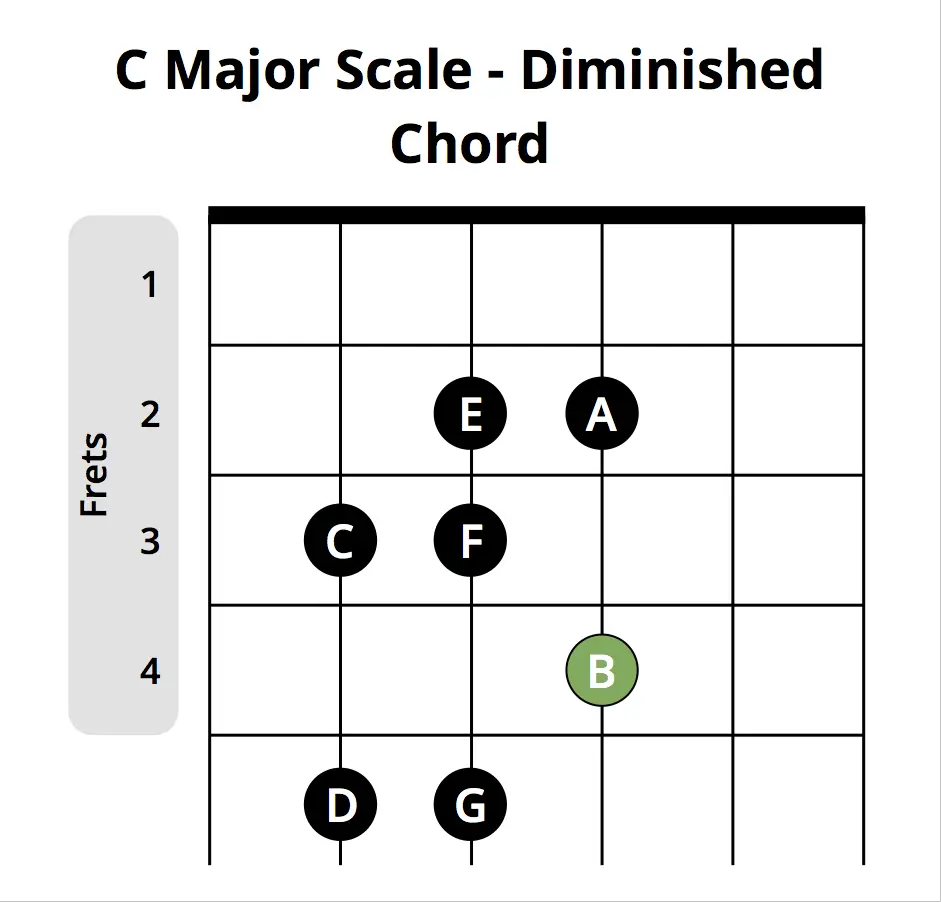
Finally, there is one last chord at position 7 which is known as a diminished chord and is not as often used. In this case, the diminished chord corresponds to Bdim.
Now that you know what chords to use for a chord progression in the key of C, you can apply this to any root note. For example, if we want to apply the chord progression theory using A as the root note we would get something that corresponds to:
- A
- Bm
- C#m
- D
- E
- F#m
- G#dim
Note: Once again, we simply used the A major scale and applied the major chord for notes in positions 1, 4, 5, the minor chord for notes in positions 2, 3, 6 and the diminished chord for the final note in position 7.
Like anything else in music, chord progressions are of course not set in stone. You do not need to follow the chord progression theory exactly in order to make something sound good.
It’s possible that a certain combination of chords will allow you to modify the note in position 5 from a major to a minor and it may still work. It all depends on the sound you’re going for and the chords you use with it. This theory is merely a guideline for outlining chord combinations that work well together.
Now that you know a little more about chord progression theory we’re going to jump into a few chord progression examples making use of what was shown above. If you’ve read through this section but still want to learn more about chord progression theory, I would highly recommend checking out this video:
Chord Progression Examples
The following chord progression examples can be used in any key. If you simply play out the major scale of the key you would like to start in and then number each note, you will be able to determine whether the chord should be a Major, minor, or diminished. Here are a few four-chord progression position examples:
- 1 – 6 – 5 – 4
- 1 – 1 – 4 – 5
- 1 – 4 – 1 – 5
- 1 – 2 – 5 – 4
To help guitarists just starting out with this concept, the section below shows which chords the positions above corresponds to starting with various root notes.
Key of A:
- A – F#m – E – D
- A – A – E – D
- A – D – A – E
- A – Bm – E – D
Key of C:
- C – Am – G – F
- C – C – F – G
- C – F – C – G
- C – D – G – F
Key of G:
- G – Em – D – C
- G – G – C – D
- G – C – G – D
- G – Am – D – C
Hopefully, you get the idea of how these chord progressions come about in the examples above.
If you want to get some randomized chord progression ideas, I would recommend checking out auto chords. This website allows you to choose your desired key as well as what type of mood you would like the chord progression to portray (this will alter the combination of majors vs minors vs diminished).
Once you set your options, simply click randomize and the site will spit out the main chord progression as well as alternatives. This is a handy tool to use if you want to just practice switching between a progression of chords or even if you want to use it for musical inspiration.
How to Deal With Finger Pain
When first starting out playing guitar you’ll certainly experience unavoidable finger pain. Your fingers won’t be used to holding these chord positions and the tips of your fingers won’t be callused yet to help ease the pain of pressing down on the strings.
Fortunately, there are a few things you can do to help speed up the process of improving your finger strength and managing the pain.
- Practice. Obviously, this has to be the first point to mention. The more you practice, the more muscle memory and strength you will develop in your fingers. Also, the more you press down on the strings the faster your fingers will callus.
- Lowering your guitar’s action. A guitar’s action refers to the amount of space between the guitar’s fretboard and the strings. The higher the action, the further away the strings are from the fretboard, and consequently, the harder you have to press down on the strings. For a beginner, a guitar with high action will hinder their ability to learn guitar chords as it is sometimes just too hard to press down on the strings. If you feel that your guitar’s action is too high and it is difficult to press down on the strings, bring your guitar into your local guitar shop and have them take a look to see if the action needs to be adjusted.
- Finger strengthening tool. As mentioned earlier in this post, you can also help build your finger strength by using a finger-strengthening tool. This tool allows you to adjust the tension for each finger so that you can progressively build strength when you’re away from your guitar. Having this sort of tool is great when you’re on the go and don’t have your guitar around, however it is no replacement for playing the guitar. If you have the option to choose, always go with playing the guitar over using tools that help build finger strength.
- Using light gauge strings. The gauge (thickness) of your strings can have an affect on the amount of force you need to use in order to press down on them. For beginner guitarists, it’s a good idea to stick with a light gauge string as these will be easier to play and cause much less finger soreness. Check out my guide on the best acoustic guitar strings.
- Numbing the pain. It’s inevitable, you’re going to experience finger pain when first starting out playing guitar. However, depending on how much you play, you’ll quickly notice that it gets easier and easier and that your fingers will no longer hurt. Until that time comes, its been said that soaking your fingers in apple cider vinegar for 30 seconds before and after you start playing can help alleviate the pain. Some guitarists have also gone as far as applying a small dab of superglue on the tips of their fingers to create makeshift calluses (use precaution with this method).
Tools For Finding Guitar Chords
These days there is a myriad of tools to help you find guitar chords. Whether you’re learning a new song and aren’t sure how to play a particular chord, or you’re just on the hunt for learning new chords in general, here are a few great resources you can use for finding guitar chords.
- GuitarTuna is an awesome app for quickly looking up a particular guitar chord on your phone. Although the number of available chords is somewhat limited, it provides you with a good list of simple guitar chords and intermediate guitar chords.
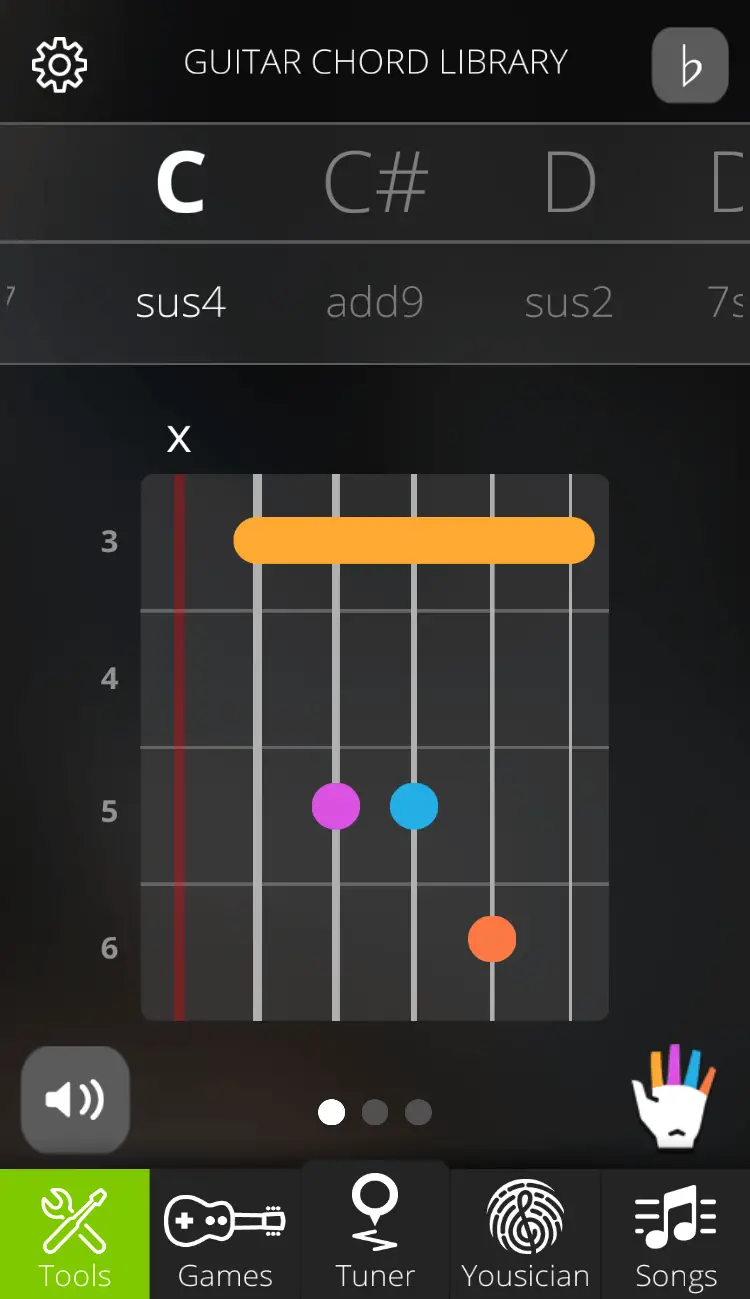 The app also gives you chord variations and allows you to play the chord so that you can hear what it should sound like.
 - Chordbook is a web-based tool for finding guitar chords. This tool provides you with many chords to choose from. It also comes with other cool features such as a capo feature that allows you to set a capo on any fret to see how the chord should sound as well as a picking/strumming option.
 Additionally, you can move around the finger placements essentially allowing you to experiment with creating your own chords/sounds. If you are logged in and come across something you like, you can simply save that chord and revisit it later.
 - Lastly, Guitar Pro the tablature editing software also provides you with a guitar chords library. Simply open the program and you’ll be able to experiment with everything from alterations, inversions, omissions, etc.
Additional Tips for Playing Guitar Chords
We’ve covered quite a bit in this article pertaining to guitar chords. However, I just wanted to leave you with a few additional tips if you are a beginner learning how to play easy guitar chords for the first time.
- Clipping your fingernails is a must. Ensuring that your fingernails are short will allow you to press down on the strings much easier as your nails won’t get in the way by touching the fretboard before your actual finger does.
- Many beginners tend to press down on a string but consequently, end up muting the string below. Make sure you are pressing down the strings with the tips of your fingers and not the flat part. If you notice that your finger is muting the string below, try slightly curling up your finger so that it is the tip of the finger doing most of the pressing.
- Resting your thumb on the back of the guitar neck is the preferred placement over resting it on top of the neck. I believe this rule can be taken with a bit of a grain of salt. Although it is very beneficial for your thumb to be behind that guitar neck for many chords (especially barre chords) I don’t think it’s always necessary. Especially for beginner guitarists, this can prove to be quite cumbersome. I still rest my thumb on top of the guitar neck for certain chords like D, E, C, etc, and see no problem with it.
- When playing chords, pick each string individually to ensure that the notes all sound clean and clear (i.e. no buzzing or muting). If you do experience buzzing or muting check that your fingers are correctly positioned and ensure you are using the tips of your fingers to press down on the strings.
Final Thoughts
That’s it! Now that you have a better understanding of guitar chords, start practicing playing them! Take advantage of the free tools mentioned in this article as well as the guitar chords chart.
Whether you just want to practice a certain chord progression or want to learn a new song keep at it and it will eventually get easier. In any case, ensure that you keep practicing and don’t give up!


Thank you for the theory/practice Cody. I stopped playing guitar and now all these sequences help me to take back my guitar. It’s an excellent guide and refreshing course for those who miss the guitar but don’t see when to re start.